In this video, Pure Polish Owner Andy answers a first time customer's question regarding which products to use first. There's a quick demonstration on how to use Leather Cleaner & Conditioner, for basic cleaning and conditioning, as shown on a pair of Allen Edmonds black wingtip derby brogues which were caught in a summer rain storm.
Tools shown:
The steps, as demonstrated are as follows:
In this video, Pure Polish Owner Andy breaks down the details on High Shine Wax Shoe Polish. What it's used for, what types of footwear its recommended to be used on, and what it isn't.
Andy also gives a brief demonstration on a pair of Italian leather split-toe derbies, where he adds two layers of High Shine, and achieves a nice reflective shine in short time, to both the toe and heel quarters.
]]>Andy also gives a brief demonstration on a pair of Italian leather split-toe derbies, where he adds two layers of High Shine, and achieves a nice reflective shine in short time, to both the toe and heel quarters.
Items used: High Shine Wax, High Quality Polishing Cloth
]]>Fortunately, there boots already had a protective layer of cream and wax. That made the restoration process a restoration of the surface waxes and not the leather itself. This allowed us to use a more advanced technique of restoring the wax (since the leather was still in good condition).
By using a softer product (Neutral Cream Polish) across the entirety of the boot, the solvent melted through the tiny scratches, and restored the protective layer. After brushing with a long horsehair brush, we used Black Paste/Wax Polish on the toes and heels to restore the extra protective wax layer, and add a little bit of “shading” to the natural leather patina.
]]>Here’s a pair of 31 year old vintage Church’s “Custom Grade” semi-brogue oxfords that’s were brought back to life with the full range of our products. Laces by Fintoco.
The process that was used was as follows:
Don’t they look fabulous for 31 years old and discarded as “too beat up”?
]]>
You've got a high quality pair of exotic leather boots, and now you want to care for them. Here are the steps for caring for your exotic leather:
In this video, Pure Polish Owner Andy goes to explain the care differences between exotic leather (including Teju lizard, snake, eel, etc.) and hot stuffed leathers – Chromexcel and Shell Cordovan.
For exotic leathers, the pore density is often much tighter, and you don't have the hair follicles you would have with calfskin or cowhide. Due to this, you may have slower absorption of the oil-based products, like our Cleaner & Conditioner, or similar balms/conditioners. You will want to be gentle on the application, to avoid over-applying, but also make sure you are giving it enough nourishment to not crack.
Once your exotic leather has been conditioned or cleaned properly, it can be beneficial to use a Neutral Cream Polish, to help protect the outside, and nourish the leather on a regular basis. A Neutral Paste/Wax Polish can also help protect the toes and heels from scuffing.
For shell cordovan and Chromexcel leather, which go through the hot stuffing phase during tanning – they have been given lots of oils, greases, and waxes. But like all oils and fats, you will eventually need to replace it over time. Again, Cleaner & Conditioner is your friend. Our Water Resistant Cream also helps reduce the spotting and solvent effect water has on these leathers.
You can also use a Paste/Wax or High Shine Wax for further protection and shine.
As always, let us know if you have a question in the comments below, or directly via our Contact Form. Thank you!
Today, Easter Sunday, 2021, we're launching an upgrade to our entire product line. Along with packaging upgrades, we're improving the look and feel to a more sensory-adaptive look, with the color of the polish on the label itself.
Read more and see!
]]>If you haven't noticed, we've got new packaging! This is an exciting development that has been in the works for a very long time.
If you remember, we launched new jars for Cleaner Conditioner back in December, to great success.
In fact, it was so successful, that we decided to package all of our soft creams in the same containers & seals.
We even upgraded the clear PET jars to UV-resistant amber PET jars. These are the same "Category 1" recyclable & reusable jars as we've been using for the last six months, with 100% success on shipping, seals, breakage, and increased shelf-life. UV-resistance increases shelf life, and extends the life of the oils longer (the same principles we follow with leather care).
This upgrade helps moves us forward with our goals:
All of our soft creams (Cleaner Conditioner, Cream Polish & Water Resistant Cream) will now come sealed with an induction foil seal that helps prevent leakage during transport. The labels are "soft touch" PET, and recyclable, as well.
Our Paste Waxes and High Shine Wax will continue to be packaged in recyclable stainless steel tins. They've been given an upgrade to soft touch PET labels, with colors corresponding to each product.
If you're unsure about which colors to select, you can use our "Choosing Colors Guide", which has now been expanded to include an up-to-date color chart, next to the corresponding label.
As always, we will continue to improve, and are always open for feedback. But today we're very excited to be rolling out this new look-and-feel, along with the substantial packaging upgrades that will make your Pure Polish experiences better and last longer, wherever you may be located in the world.
Happy Easter, and thank you for your support!
~Andy & Family
]]>It can feel tragic when you break your beautiful mirror shine on your leather dress shoes. Especially after you spent so long building and perfecting it, all the way up from the base leather. However, there are some shortcuts to fixing it, that take much less time than the initial process that's required for the build-up.
In this video, Andy demonstrates one of those techniques, using the fresh underlying layer of solvent on a tin of High Shine Paste/Wax Polish.
]]>It can feel tragic when you break your beautiful mirror shine on your leather dress shoes. Especially after you spent so long building and perfecting it, all the way up from the base leather. However, there are some shortcuts to fixing it, that take much less time than the initial process that's required for the build-up.
In this video, Andy demonstrates one of those techniques, using the fresh underlying layer of solvent on a tin of High Shine Paste/Wax Polish. Using the solvent to smooth the top surface, Andy fixes a broken shine in about 3 minutes, from start to finish. The advantage to using this method over some of the other methods that use heat (lighters, heat guns, hair dryers), is that it maintains a consistent amount of product on the shoe, and doesn't risk permanently affecting the leather grain or corium, through excess product or heat exposure.
]]>We were asked this question in a comment on the Goodyear Welt Subreddit recently, and thought we'd elaborate a bit more about what goes into polish in-general, as well as what we specifically add to ours – ie. what makes Pure Polish special.
All leather polish must have four basic ingredients:
Solvent has two main purposes:
Wax has four main purposes:
Can polish be made without conditioning oil? Yes, that’s usually a High Shine or Mirror Gloss Product, designed for maximum cosmetic appeal.
Can polish be made without solvent? Yes, but then you’re using other products like borax to soften the wax.
Can polish be made without wax? Conditioner can. But again, you are limiting your protection, running the risk of over application, and coloring the leather directly.
Can Polish be made without color? Yes, that’s Neutral, High Shine, or Cleaner/Conditioner type products.
Our products contain only the following all natural, non-toxic, pleasant smelling ingredients:
We use food grade orange terpenes (d-Limonene). Orange oil contains the raw oil collected from the citrus peel during the juicing extraction process. Once orange oil has been extracted from the rind, d-Limonene is separated from sesquiterpenes, other monoterpenes, and is purified by high vacuum distillation to produce food grade d-Limonene. The orange citric acid has a pH value of approximately 3.5, similar to the pH value of vegetable tanned leather which is approximately 3.2 (chrome tanned leather has a pH of approximately 3.8).
Orange oil contains citric acid and ascorbic acid, both of which are preventative antioxidants, and assist in oxidative stability. Orange oil is considered a volatile oil because it evaporates relatively quickly (over a few hours) when exposed to air (not in a closed container); this allows it to act as a solvent, rather than a lubricant like coconut oil. Pure Polish will last well over a year, if the jar is only open during use (this is true of any shoe polish).
We use organic extra-virgin coconut oil. Coconut oil is about 50 percent lauric acid, a rare medium-chain fatty acid, and is studied for its anti-fungal, anti-viral, and anti-bacterial properties. Overall, coconut oil contains 92% saturated fats (mink oil contains about 80% saturated fats). Saturated fat percentage is a major factor in determining oxidative stability; the higher the saturated fat percentage is the higher the oxidative stability (See Iodine Value below).
Coconut oil has a neutral pH balance (7.0), similar to mink oil (6.5).
Our Beeswax is one of the most natural wax products available. Beeswax is the wax made by honeybees intended for the protection of their honeycombs. The main components in beeswax are palmitate, palmitoleate, and oleate esters of long-chain (30-32 carbons) aliphatic alcohols, with a ratio of 6:1 of triacontanyl palmitate to cerotic acid, the two principal components.
The Carnauba wax we use is a natural vegetable wax exuded by the leaves of a palm tree (copernicia cerifera) growing in Brazil. It is the hardest natural wax available, composed of wax esters (85%), free fatty acids, fatty alcohols and resins (15%). Our Carnauba wax is basically odorless.
We use Earth and Ocher pigments for our coloring. All of our coloring is safe, non-toxic, environmentally friendly, and free from chromium, cadmium, mercury, tin, arsenic, radium, lead or other hazardous materials.
View our catalog, to see the assortment of products we make from these ingredients.
]]>Here are some of the top social media posts using Pure Polish Products from the week of June 15-21, 2020.
]]>
Allen Edmonds Black Adelaide Oxford Mirror Shined Heel to Toe by @LEShoeguy
Antonio Meccariello Hatch Grain Chukka Boots with a Beautiful Patina and young puppy "Captain" by @DEShellvedge
Black Leather Braided Tassel Loafers by @Mr.Renworks
Black Selvedge Denim mixed with some sleek Carmina Amaretto Shell Cordovan Monk Straps by @DEShellvedge
Mirror Shined Bontoni Braided Cap-Toes in Dark Brown by @Mr.Renworks
Bridlen Shoes brown oxfords polished to a mirror shine Singapore by @the_ghillie_brogue
Carmina Model 80406 Adelaide Natural Shell Cordovan Rain Last by @DEShellvedge
Carmina Shoemaker Horween Color 4 Shell Cordovan Boots Black Selvedge Denim by @DEShellvedge
Carmina unlined chukka Shell Cordovan boots model 80728 by @DEShellvedge
Corno Blue Russian Hatch Grain Patina Split-toe Derbies by @DEShellvedge
Herring Shoes Burgundy Tassel Loafers polished up by @FUMU.SG using Pure Polish Products and a Goat Hair Brush
Pure Polish Black Water Resistant Cream Polish wet in rose bushes by Fumu Singapore
Saint Crispins Mod 403S Shrunken Calf Leather Classic Last Norvegese Hand Stitch by @DEShellvedge
Saint Crispins Natural Shell Cordovan Apron Toe Derbies worn, handled, and shined by @DEShellvedge
Restoring Santoni Dark Brown and Black Patina Leather Derbies
]]>
This year we're offering a Father's Day Special Promotion. All purchases get a FREE Premium Polishing Cloth (Regular $6) automatically, when cloth is added to cart.
Each premium cloth is hand-cut from natural 100% tightly-woven cotton, making it the ideal final buffing cloth, or for application of stiff waxes and High Shine during the Mirror Shine process.
]]>This year we're offering a Father's Day Special Promotion. Between today and Father's Day (June 13th through June 21st), all purchases get a FREE Premium Polishing Cloth (Regularly $6) code "FATHERSDAY2020" is automatically applied when you add the cloth to your cart.
Each premium cloth is hand-cut from natural 100% tightly-woven cotton, making it the ideal final buffing cloth, or for application of stiff waxes and High Shine during the Mirror Shine process.
]]>Here's a chart breaking down the pigment colors of each of our polish offerings. And while each product may not imbue full-richness or depth of the colors shown, this is the "true nature", of the pigment itself, and what – over time – the migration will progress towards.
As always, let us know if you have any questions, or if there are any colors you'd love to see that we're currently missing!
]]>Shell Cordovan is an amazing material. It responds very differently to products than standard calfskin leather. In fact, we often just recommend a damp wipe-down, brushing, and some Neutral Cream Polish, to keep your shell in good shape, most of the time. This allows it to develop a natural patina or fade, and still stay protected.
However, every once in a while, we want to mirror shine our shoes, or add some additional protection. Today was one of those times.
These vintage cordovan derbies are over 60 years old, but healthily part of my current rotation. Never one to squander a good pair of shoes, I wear them in the rough-and-tumble dirt and rock paths of Bend, Oregon. This lead to some beat-up, dust, surface scratches and rubs this week, as you can see.
However, it doesn't take much to bring them back to life.
I did a quick wipe-down with a damp cloth, a vigorous brushing with a short horsehair brush, and then a single thin layer of Black Water Resistant Cream Polish to cover the surface.
This got them looking dapper again.
However, I also love to add a quick shine to the toes. But, since I had added a water resistant product, I knew I wouldn't want to use any water based techniques (Our Water Resistant Cream Polish repels water, as opposed to preventing its absorption). So, I wanted to show a technique I use to get a quick mirror, without any water buffing.
Here's a video of "Dry Mirror" shining Shell Cordovan, with your fingertips, and some thin swipes of High Shine Paste/Wax Polish.
Try the technique out yourself, and let us know what you think. It's not as good as a standard mirror, with lots of buffing. But, it's a quick fix, and good shortcut for heavily worn shoes that you still want to look good, between wears.
]]>
Polishing grain leather is not an easy thing. Caring for the leather care be quite straight forward – keep it conditioned with Conditioner, protected with Cream, and add some scuff protection on the toes and heels with Paste/Wax Polish. But, getting that magic mirror shine or even a nice quality high shine, can sometimes be elusive.
Grain leather has more texture, it's grainy (by definition), and rubbing stiff waxes across grain can be challenging.
Read How...
]]>It's not an easy thing. Caring for the leather care be quite straight forward – keep it conditioned with Conditioner, protected with Cream, and add some scuff protection on the toes and heels with Paste/Wax Polish. But, getting that magic mirror shine or even a nice quality high shine, can sometimes be elusive.
Grain leather has more texture, it's grainy (by definition), and rubbing stiff waxes across grain can be challenging.
Alternating soft waxes and hard waxes allows you to build up your base. Sometimes even using 1 layer of Cream Polish, followed by 1 layer of Paste/Wax Polish, then repeating, will build up that protective layer, so that you can have a smooth top surface.
Having a smooth top surface is essential to a good reflective shine. The lack of bumps, occlusions, and divets, will allow light to bounce back uniformly and give a nice shine.
After each dual-layer, brush it smooth, and let it dry/evaporate fully, before evaluating and continuing with another base layer.
Once you've finished a multi-layer soft & hard base, then you can begin your standard mirror shine techniques.
When you finish your shine, it should be smooth and glassy. As you get to that final glassy layer, the top section begins to feel like snake or fish skin, with the scales being both smooth and textured. It feels unique under your fingertips, and can be one of your favorite leathers to polish, as you get good and practice with it.
Shine on friends!
]]>Choosing which color of polish to buy for your valued pair of shoes can sometimes be tricky. Photos show a wide-range of leathers using a single polish color: For example, Walnut can be used to bring out the reddish tones in a lighter brown leather, or can be used to tone down the reds and accent the browns in a burgundy or mahogany colored leather.
To make it trickier, there is no one single uniform "color name" that we all use. From the leather industry, to the shoe industry, to the leather care industry, we all select a name that best represents our intended audience, and then hope they can figure it out by looking at the pictures.
So as to not totally confuse you, we created this line-up of common shoe colors and leathers, to show you which color polishes we would select to best "color match" the leather.
As always, let us know if you have any specific questions, or are still struggling on your particular pair of shoes. We may be able to help you narrow it down.
From Left to Right: Light Brown, Light Brown, Walnut, Walnut, Brown (or Burgundy), Brown (or Dark Brown), Black, Burgundy.
Now, here are the polish colors we show in this line-up*: Light Brown, Walnut, Brown, Dark Brown, Black, and Burgundy.
* Missing: White, Navy Blue, Forest Green, Custom
Polishes Pictured: Light Brown Cream Polish, Walnut Cream Polish.
Polishes Pictured: Brown Cream Polish, Dark Brown Cream Polish.
Polishes Pictured: Dark Brown Cream Polish, Black Cream Polish, Burgundy Cream Polish.
]]>For us, celebration and appreciation of Nature’s Beauty goes into everything we do. From the very small, to our worldwide efforts. On Earth Day today, we’d like to continue to recognize and celebrate Nature, the Earth, its beauty, and its strengths.
All of our products are made from all-natural, biodegradable ingredients. No animal fats, chemical dyes, or preservatives. Nothing but Pure Polish.
Read more about what goes into our polish.
Live Beautifully. Shine Naturally.
Below are some recent nature shots of Allen Edmonds Walnut Weybridge, polished to a mirror and given a warm glow. These are well-used shoes, not out of the box. They're just given proper care with our products.
]]>
For us, celebration and appreciation of Nature’s Beauty goes into everything we do. From the very small, to our worldwide efforts. On Earth Day today, we’d like to continue to recognize and celebrate Nature, the Earth, its beauty, and its strengths.
All of our products are made from all-natural, biodegradable ingredients. No animal fats, chemical dyes, or preservatives. Nothing but Pure Polish.
Read more about what goes into our polish.
Live Beautifully. Shine Naturally.
Below are some recent nature shots of Allen Edmonds Walnut Weybridge, polished to a mirror and given a warm glow. These are well-used shoes, not out of the box. They're just given proper care with our products.
]]>Time Needed: 15 minutes
Products Used: White Cream, High Shine Paste/Wax
White leather shoes are notoriously difficult to keep white. Fortunately, we make a White Cream Shoe Polish that allows you to keep your white leather vibrant and clean-looking.
The shoes weren't filthy. But they had some grime embedded in the grain of the toes, which you can see. Plus, with white leather, it shoes up much more prevalantly.
Take a small dab of polish on a soft cloth, and apply it in a swirling motion, to press it into the grain of the leather, and pick up the excess dirt and grime.
After applying the cream polish, take a short horsehair brush, and brush briskly across the surface, to ensure the polish gets properly absorbed within the grain.
After briskly brushing, take a clean cloth, and rub it across the surface of the leather, to pick up any excess cream.
Now that the surface is clean and dry, use Neutral/Clear High Shine Paste/Wax to protect and shine the toe.
Apply the High Shine using fingertips, in alternating vertical and horizontal stripes. This allows the wax to get embedded in the grain, and form a protective and hard surface layer. This hard surface layer offers clear protection and extra shine.
See the finished results.
]]>
Time Needed: 2 hrs
Active Time: 40 minutes
Waiting Time: 1 hr 20 minutes
Tools Required: Cleaner Conditioner, Burgundy Cream, High Shine Wax, Soft Flannel Cloth, Water Spritzer, Horsehair Brush
With the COVID-19 Pandemic, most of us are spending a lot more time at home than we're used-to. With all this time at home, many of us are looking around and wanting to clean or upkeep our environment, furniture, office, kitchen, etc.
We're part of that stir-crazy bunch. And, when a family member enticed us with the question, "Do you ever use Pure Polish to clean, restore, or use on wood furniture surfaces?" We had to try! Of course, we've had some wonderful customers send in their examples and testimonials as to it working wonders on hardwood floors, or for encaustic painting. But, we hadn't tried it ourselves, yet.
I had been noticing that our red end table was getting a bit more use than it had been in recent years. There were coffee stains, other gunk, and was generally dull. So, that became the subject of our little experiment.
Approximate Time: 15 minutes
Our Cleaner Conditioner uses orange oil, which is fantastic for cleaning, and coconut oil, which is fantastic for conditioning, and a little beeswax, which is good for simple protection.
With very light dabs on a soft flannel cloth, I swirled this around the surface, and immediately began to see an effect. The orange oil cleaned the wood surface beautifully. It picked up dust, and rehydrated the wood grain itself. The orange oil removed the grime and staining that was on it.
After a successful cleaning round, I noticed there were some scuffs in the wood itself that stood out against the otherwise beautiful red finish.
Approximate Time: 10 minutes
The closest color we offer to the red surface of this table is our Burgundy Cream Polish. The rich pigment in our cream polish is perfect for restoring and adding vigor to leather grain, so I wondered if it would work similarly with wood.
I took small dabs of product, and applied it in circular motions with my fingertips, massaging it into the grain.
The pigments and oils were absorbed by the wood, and the scuffs no longer stood out against the rest of the surface.
Let dry 20 minutes.
Approximate Time: 15 minutes
One of the key principles to a good shoe shine, is to not leave the surface "sticky". We assume the same principles apply here with wood polish, so we wanted to finish it with a higher gloss product, using stiff/hard waxes, to protect the surface, and give it an appropriate finishing luster, and have it dry smoothly and not leave any colored product to be picked up by later use.
For a neutral/clear finishing wax, we selected our High Shine Paste/Wax. Similarly to the final buffing of a mirror shine on a shoe, we took small dabs, and "swirled" it into the wood grain. Very thin dabs allowed for smooth application, without any clumping or over-wax accumulation.
After covering the whole of the surface with a thin layer of High Shine, I went around the outer bevel and also covered it with a thin layer.
Always making sure to keep the surface smooth, I only utilized very thin dab amounts, before spreading it.
And, since we're "Shoe People", I took a long horsehair brush and lightly buffed across the surface of the table, to ensure it was spread smoothly and evenly.
Wait 1 hr to let the solvents evaporate and waxes to harden and dry.
Taking the soft flannel cloth, I took a single spritz of water across the surface, and lightly buffed the top of the table in a circular pattern.
That was how it finished. Now the surface is super smooth, protected a bit more from regular use, and is much brighter.
Take a look at the video above. to see the final result.
Let us know in the comments below if you've ever done a project like this and what your results were.
]]>They were given new life recently, using only our products for a full restore from start-to-finish.
Picked up from the bottom shelf of a thrift store for $4, we recognized that the leather still had a lot of life left in them, if given some love and chemistry attention.
These vintage Florsheim Imperial wingtip full-brogue oxfords were given new life recently, using only our products for a full restore from start-to-finish.
Picked up from the bottom shelf of a thrift store for $4, we recognized that the leather still had a lot of life left in them, if given some love and chemistry attention.
Made from full-grain calfskin, we could tell that it had dried out and was scuffed on the surface, but the integrity of the leather - overall - was still intact.
Given it was a used pair of shoes, we first swiped the insides completely with 70% Isopropyl Alcohol. Then, we found a pair of shoe trees that fit this size (US 10.5 D), and put them inside to regain the natural size.
To remove surface waxes and old dirt & grime, we used Cleaner Conditioner with cotton balls.
After the surface was relatively clean, we sanded it down using a top-down-top progression of grits: 1200, 1000, 600, 200, 600, 1000, 1200. We only used the heavier grits on the deeper scuffs. If you've never done this before, it's kind of like scrubbing calluses off (leather is dead skin, after all). You're just trying to get to the soft, smooth under-layer. Be gentle, but it can help if a scuff is too deep to cover up with standard creams or pastes.
After sanding, we recognized that the leather still needed conditioning oils (all leathers come from the tannery with oil imbued within it. These had obviously dried up over many years, and not been replaced.) So, again, using Cleaner Conditioner, but with our fingertips this time, we added the conditioning oils back into the leather. We wiped off any excess, brushed it into the fibers, and let it sit for 24 hours.
*Note: We wish we took pictures at this point. But forgot and only got good before/after pics.
Letting the leather sit, evaporate, and condition for 24 hours is essential to regaining the integrity of the fibers. If you rush it too quickly, and don't let the solvents evaporate fully, you may force too much product into the pores, or smother the fibers themselves.
We then added Colored Cream Polish in both Walnut and Brown - Walnut for the vamp, Brown for the toes and heels.
Thoroughly brushing with a horsehair brush into the fibers, wiping off the excess, and brushing again, was the process for finishing the cream polish into the leather.
For a final step, we added Brown Paste Polish on the toes and heels for extra protection, color depth, and shine. This was applied using fingertips for thin layers, brushed smooth, and then buffed like a "mirror shine" or "lensing" process.
Enjoy the "after" pics!
]]>
And, while we love and fun with all the local animals, and historic exhibits, given we are in the Leather Care Industry, we take particular joy in seeing the old trades, especially leatherwork, cobbling, and how it was done "back then".
Here are a few photos from the most recent visit.
We are lucky that each day our customers, friends, and fans tag us in social media posts, send us reviews, images, upload videos, and write blog posts about Pure Polish.
Here are a few of this week's community favorites.
There is a beautiful collection of high shines, mirror shines, and versatile "soft shines", using a collection of our products.
]]>If you have images, videos, or posts you'd like to share with us, feel free to contact us or send us a DM on any of the mainstream social medias.
Here are a few of this week's community favorites.
]]>
1. Vintage Florsheim Imperial Wingtips
2. Allen Edmonds Strands
3. Crockett & Jones Two-eyelet Almond Toe Derbies
4. Swiss Navyboot Classic Round-toe Oxfords
All of these pictures were taken the same afternoon at a Summer Event we had in Bend. Typically we will spend most of that time talking with customers and showing them how to do shoe shines like seen below.
None of these photos were altered to create this shine. No filters were added, as you can see in the video below. This was a good lighting situation, and all of these shoes glittered-up like diamonds when responding to our polish.
]]>Take a look...
]]>1. From High Shine to Mirror Shine - showing how to go that next step to achieving your first mirror shine, using two rounds of High Shine on top of a Wax / Paste base, demonstrated on a pair of Merlot Allen Edmonds Arlington Kiltie Loafers.
2. Good Morning Mirror Shine Monday – A pair of Walnut Allen Edmonds Weybridge Oxfords, polished from calfskin to a glassy mirror.
3. Before & After on a pair of Vintage Florsheim Imperial Wingtips - Using only Pure Polish Products Cleaner Conditioner, Color Creams, and Color Paste, we brought the life back to these vintage Florsheims.
4. Magnanni Calfskin Derby Shoes Naturally Shined to a Mirror - This is a personal pair that needed some love. So, they got a good conditioning treatment and a nice mirror shine using High Shine. They glistened right up!
5. Throwback Thursday with Glen's Berluti Wholecuts - Glen's polished Berluti Wholecuts using High Shine Paste. This is the picture that drew Andy to finding Pure Polish Products in Bend.
6. Touch up Mirror Shine on Vintage Walnut Scotch Grain Allen Edmonds Margates - This was just a "touch up" to an old mirror shine. I loved showing how adding a mirror to scotch grain gives it a "fish skin"/scales smooth appearance and texture.
7. Vintage Early 1900's Sears & Roebuck Catalog - We found this old catalog at the High Desert Museum, wherein the most amazing leather shoe section was found. Many pages were photographed, but it would have been great to get the whole thing.
8. Shoe Shine Sunday Pure Essentials - This was part of a blog post I did earlier this year on "The Ultimate Shoe Shine". These were the products I used to achieve this shine on a pair of Navyboot Calfskin Round Toe Classic Oxfords.
9. Mr. Renworks Quadrifoglio Scarpe Cherry Wholecut Adelaide Oxfords - These beautiful shoes combine Italian elegance with Japanese excellence, and an unbeatable and unique aesthetic. We're lucky for Thanh to have used Pure Polish High Shine as part of his routine for shining these amazing shoes.
All-in-all, it was an amazing 2019. We wish we could show all of the photos one more time, but that would fill 100 blogs. Thank you to everyone who contributed and supported us this year. We hope 2020 brings more wonderful news, surprises, and growth towards more natural shine in the world. Shine on, friends!
]]>This morning, before I stepped outside on this brisk and blustery Winter day here in Bend, I conditioned my Allen Edmonds Weybridge Walnut Calfskin Oxfords. Bend has a very dry desert climate, so it dries out leather super-quickly. This is why it's super important to keep it conditioned, so that it doesn't crack.
The trick for getting the most from your Cleaner Conditioner is to apply it with your fingertips. Then you aren't leveraging the cleaning oils as much as the conditioning oils.
The mirror shine was still intact and looking shiny from a few wears ago.
I paired it all with Fintoco Grey laces, Raleigh Denim Workshop jeans, and some fun Nautica socks.
Let me know what you think!
]]>I decided to pair my Allen Edmonds Margate Derbies with some Raleigh Denim Workshop Raw Denim jeans, and Nautica socks with a little orange highlight (it's Fall, after all).
]]>Used: Walnut Cream Polish, High Shine Paste/Wax.
I applied the Walnut Cream Polish with my fingertips very lightly to the upper vamps (not the toe-cap or heel), as these shoes already had a good few layers on them. The leather was looking like it could use a little moisture (conditioning coconut oil in the cream polish), and color protection (walnut pigment).
I used a thin cotton cloth wrapped tightly around my fingertips, with the High Shine Paste/Wax, along with a water spritzer. I used single droplets of water and "dab" & "swirled" the wax very gently on to the toes and heels to get the mirror shine. This was mostly a "touch-up" on a previous shine. So it didn't require more than 2-3 minutes of "dabs & swirls" before it got the beautiful shine you see in the pictures.
]]>
11-minute video where Andy shows how to apply Paste/Wax Polish to the toes and heels of your leather shoes and boots. Andy gives descriptions of the "how's" and "why's" of using Wax versus Cream, where and why to apply it, and the different application techniques.
Check it out and let us know what you think in the comments below!
Video was filmed and edited by Travis Tuttle Photography.
]]>Imagine a pair of sunglasses for your shoes or boots. Lensing is a technique whereby you add a different colored or shaded lens to the toes and heels of your shoe or boot.
Lensing is different from burnishing, antiquing, or patina, in that the color remains embedded within the wax, and doesn't impregnate itself within the base leather. It compliments leather patina, by adding a new dimension through light effects. This technique uses two key products - Cream Polish and Colored Paste/Wax.
Additionally, you can mirror shine on top of the lensing, for increased color and light effects.
]]>Time Needed: 15-20 minutes
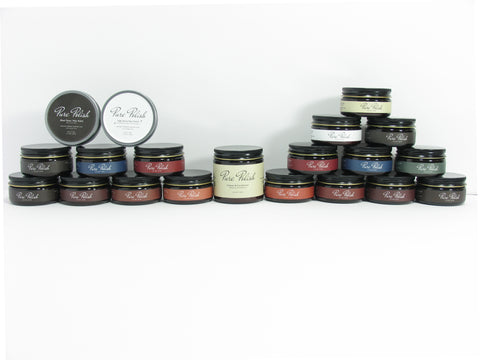
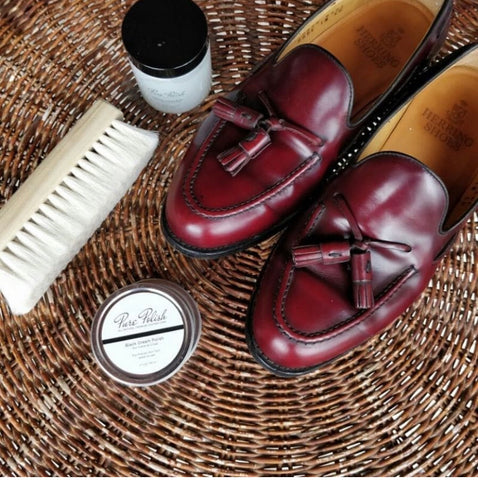
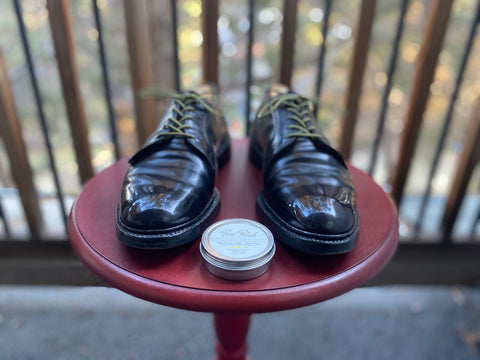
Tools Required: Horsehair Brush, Cotton Cloth, Water Spritzer, Color Cream Polish, Color Paste/Wax, High Shine Paste/Wax (optional), Leather Shoes or Boots
Imagine a pair of sunglasses for your shoes. This is what I call lensing and shading.
Lensing is a technique for adding a subtle color over the base of your leather shoes or boots, that changes their appearance depending on the light. It could appear significantly darker or a different hue than the base leather, depending on the color of wax you use and whether the light is direct, shaded, indoors, or outdoors.
Lensing is different from burnishing, antiquing, or patina, in that the color remains within the wax "lens" and doesn't impregnate itself into the base leather. It compliments patina, by adding a new dimension through light effects.
You can use different color waxes (ex. Burgundy or Navy Blue) to add unique coloring, or you can go for similar-but-darker shades of your base leather, or Black for increased shading on lighter colored leathers.
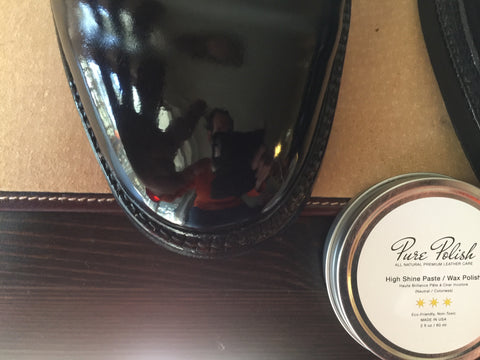
Additionally, you can add a mirror shine on the top of lensing, to reflect and add further dimension to the color and light changes.
To begin lensing, first ensure your shoes or boots are clean. Take your horsehair brush and brush off any dust and debris. Thoroughly warm up the pores of the leather with your brush strokes.
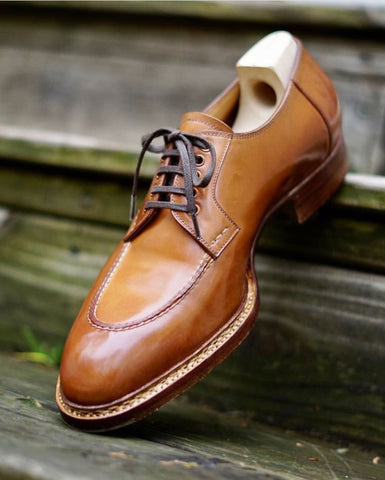
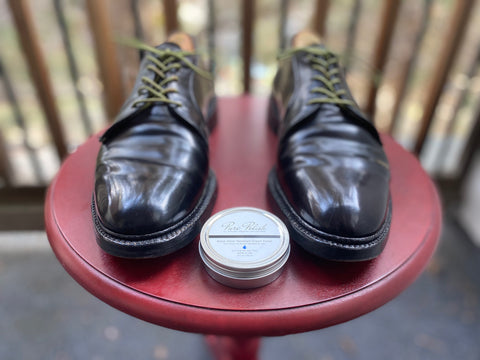
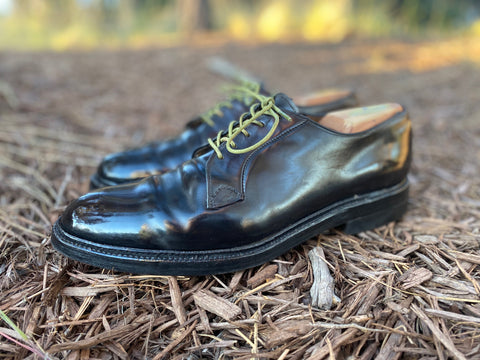
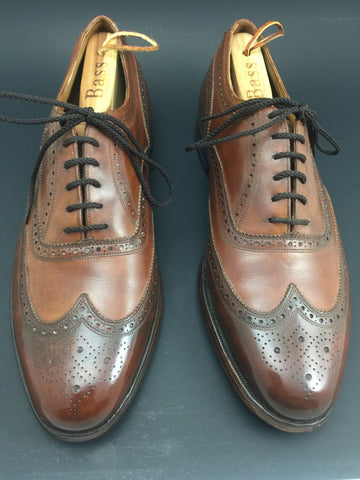
For this example, I'm using a pair of Allen Edmonds Benton Derbies, Light Brown Cream Polish and Black Paste/Wax.
Use your cotton cloth and spritz once or twice with water until it's damp, not wet, and rub it across the surface of the leather. With warmed-up leather pores and the water beginning to evaporate, you have primed your leather surface to be receptive to the base layer of Cream Polish.
Using your preferred application technique (cotton cloth or fingertips), apply a thin layer of Cream Polish around the entirety of the shoe or boot. Rub it in to the grain of the leather using circular strokes or fore/aft and side-to-side rubbing.
You want minimal cream remaining on the top of the leather after you apply it. The majority of the oils and pigment should be embedded in the leather grain, and only a thin layer of waxes should remain on top. Picture rubbing-in skin lotion: you don't want any excess remaining on the top of the surface of the skin, as it will only attract dust and dirt.
Brush the cream into the pores using your horsehair brush, and ensure an even spread of the waxes.
Take your cotton cloth and pull it taut over your fingertips. Swipe your fingertips across the surface of the leather and pick up any remaining excess polish.
You shouldn't get a thick amount of polish when swiping across the surface, otherwise you applied it too heavily.
After swiping across the leather with the cotton cloth, brush it one more time, and you'll begin to see a warm glow from the leather. It should be dry to the touch, not tacky, and look restored.
I highly recommend using your fingertips for this process, as a cloth can be overly rough and grab excess wax within the fabric.
Select a Colored Paste/Wax for your preferred lensing. If you're unsure and just want to try this technique for the first time, stick with black, and add shading.
If you want to play with colors, pretend you're considering what shade of sunglasses you'd like to use as a cover on the top of the base leather. Typically, darker shades or contrasting colors offer the most noticeable difference.
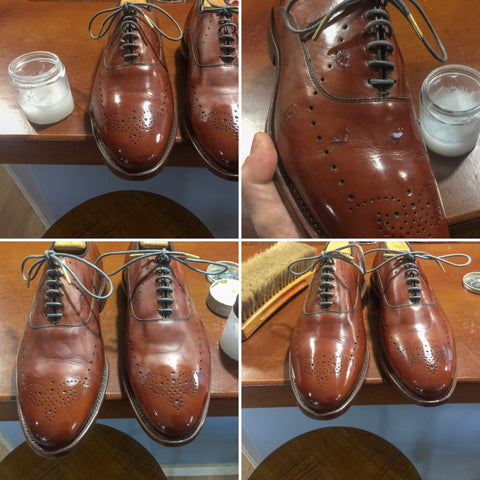
Slide gently across the surface of the wax with your fingertips. You should have minimal, but noticeable, product on your finger. Begin at the top-middle of your toe-cap, and stroke directly downwards towards the front of the toe, leaving a thin layer of product on the surface of the leather. Move your finger directly to one side of the initial stroke, and repeat in-parallel. Do this until you've covered the toe-cap from top to bottom.
The strokes should be very thin, and even if you feel you're outputting very little, it's better to be thin with your application, than to be too-thick.
Once again, rub across the surface of the wax to get more product on your fingertip. Repeat strokes across the top of the toe-cap, except now you want to go side-to-side, cross-hatching the toe-cap.
Repeat this process on the other shoe or boot. Then, similarly, do it on the heel quarters, sticking to the non-flexing areas.
If you're unsure where your heel flexes or doesn't flex, stick to the areas directly around the seam or just above the welting within a 1-2 square inch area of the direct back of the shoe/boot.
After a full-rotation of toe-cap (x2), and heels (x2), repeat the above process. The wax should begin to get glassy and solid.
If you find any occlusions in the wax, thick spots, or major streaks, remove them with your fingertip or through brushing, and repeat with another thin layer of colored wax.
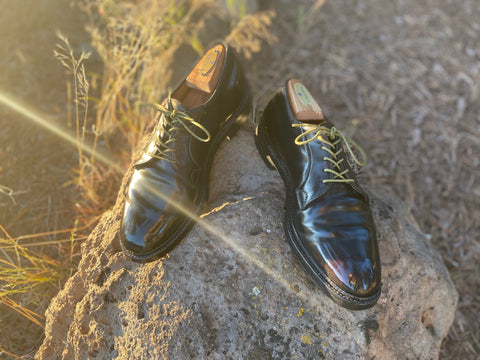
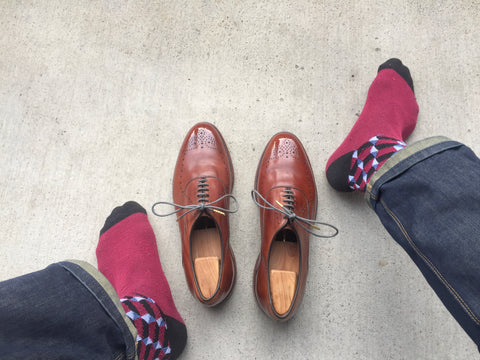
Once you've covered both shoe areas with a solid layer of colored wax, take a step back and examine the lensing you've created. Take it outside, and look at it under different lighting.
If it appears streaky, you can brush it gently (using approximately 80% through-pressure, and 20% down-pressure), until the streaks are gone. If the brush removes some of the layering, you can add another thin layer of wax.
Additionally, you can add a mirror shine on top of your lensing. Usually the steps involved in creating a mirror shine will remove all occlusions, and smooth out the wax, but it may also reduce the colored layers, in-which case you can intermix the Colored Paste/Wax with your High Shine, and keep the lensing along with the mirror shine.
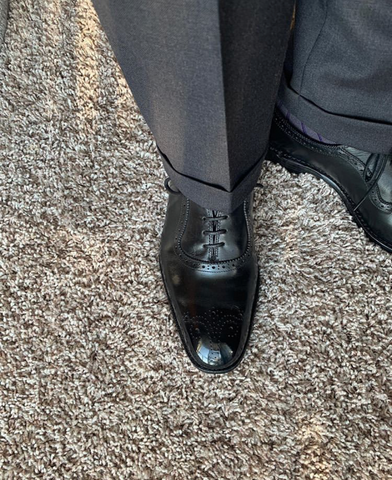
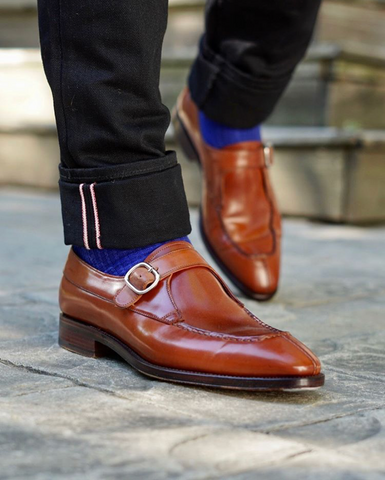
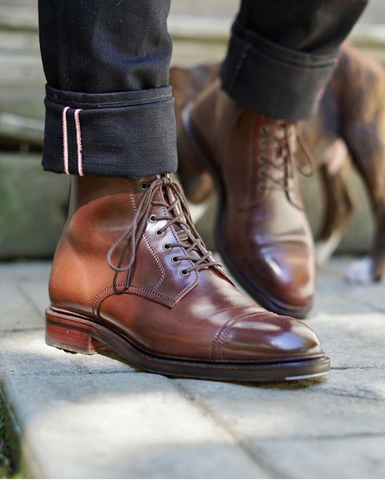
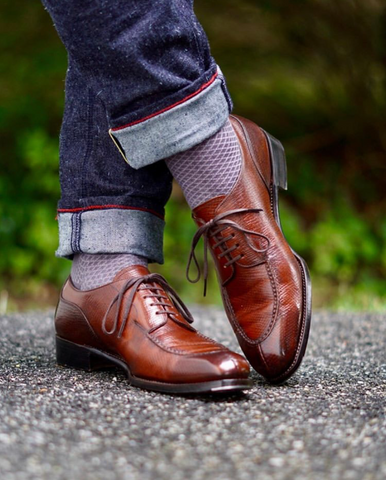
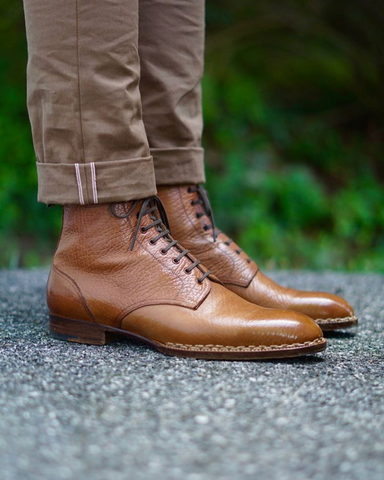
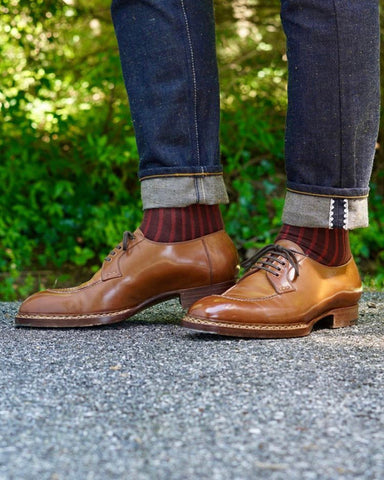
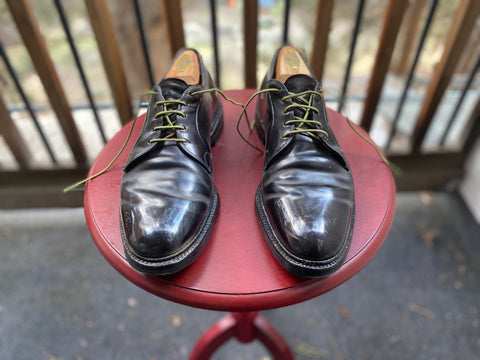
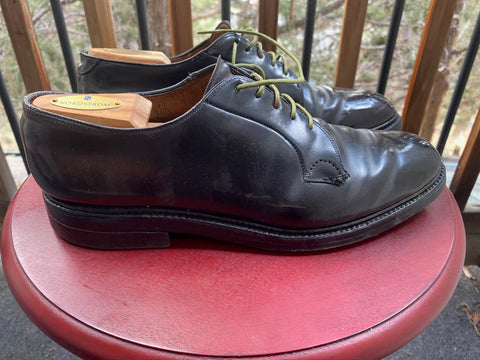
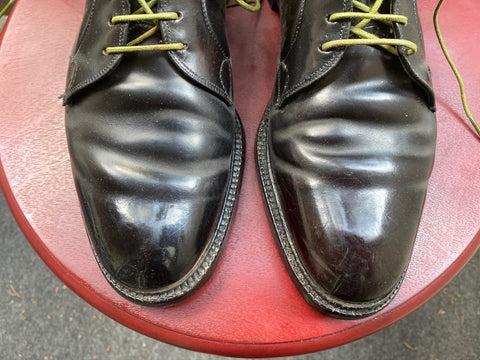
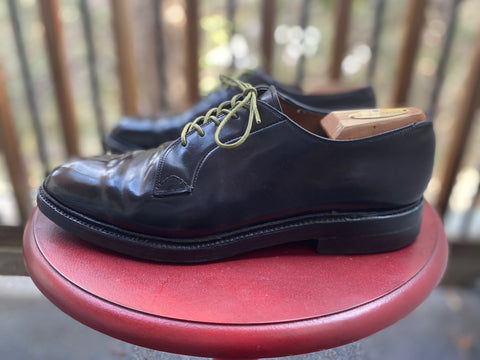
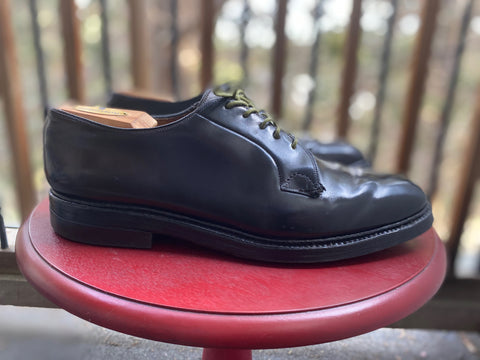
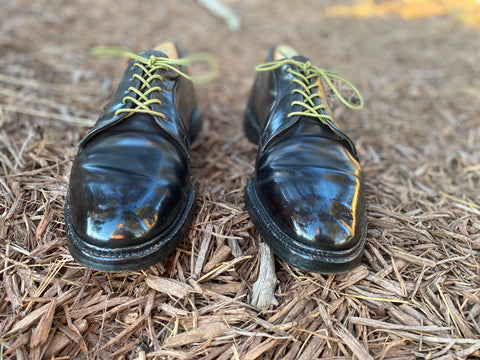
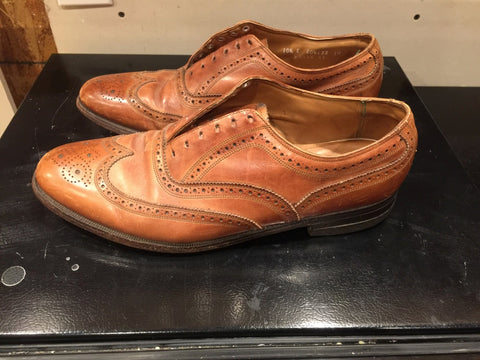
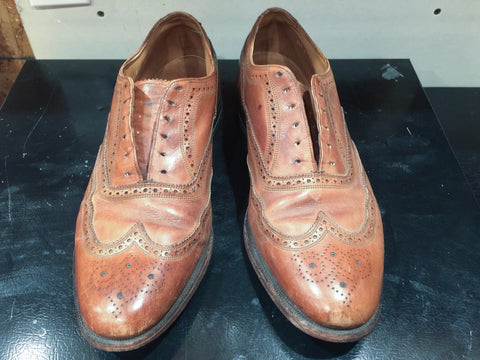
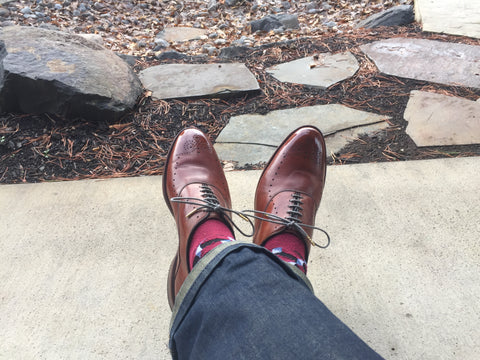
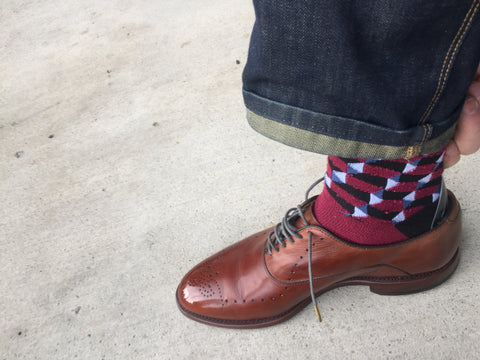
See below how the different lighting affects the contrast difference between the light brown leather base and the black lensing on these derbies. Notice both the toes and the heels (in the profile shot).
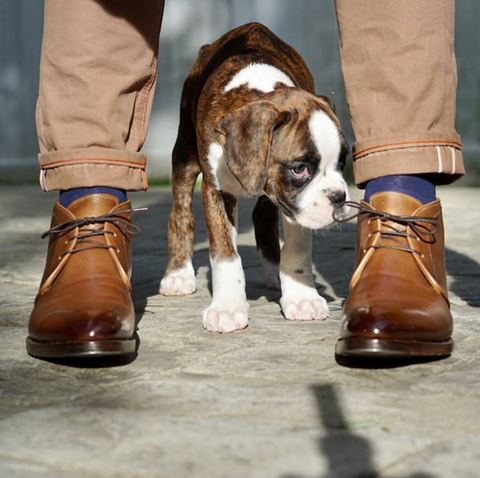
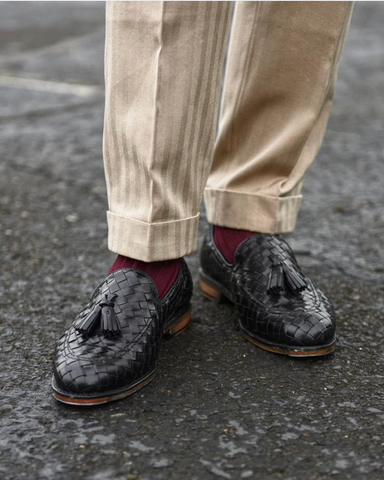
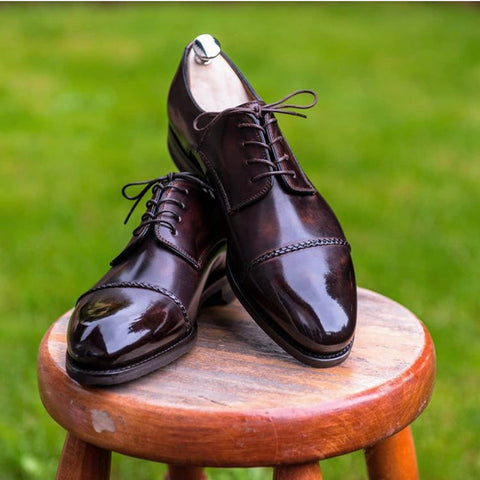
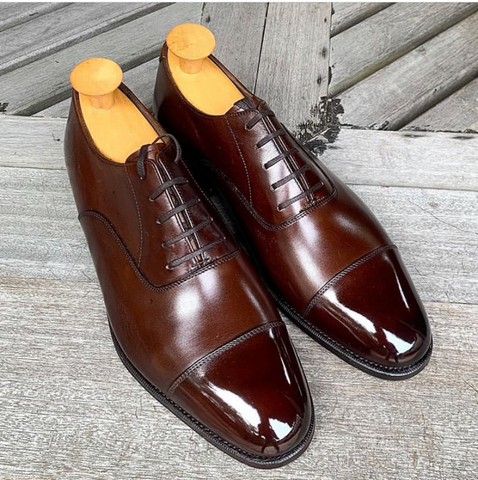
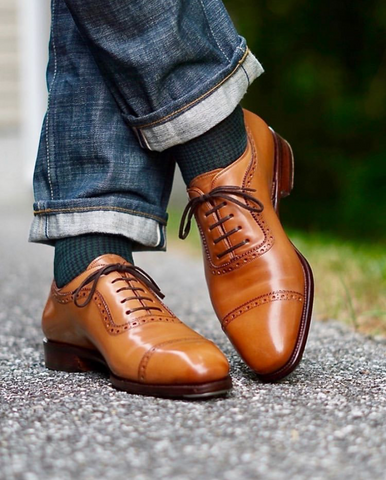
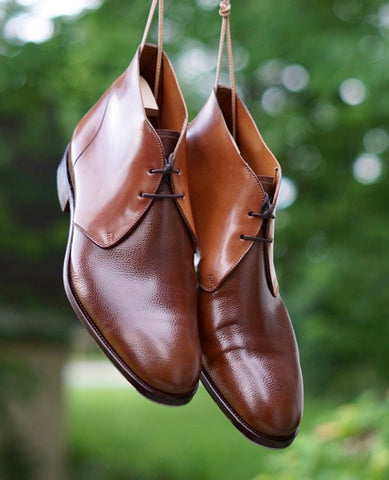
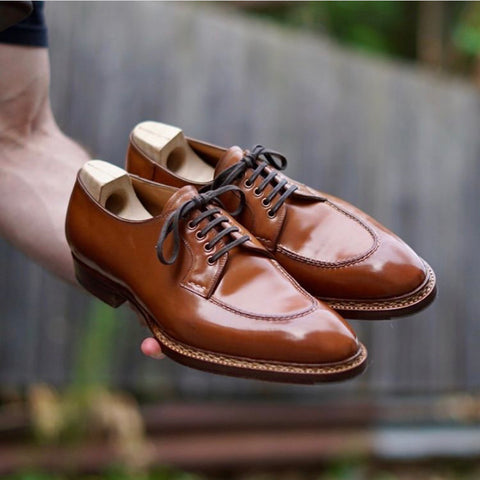
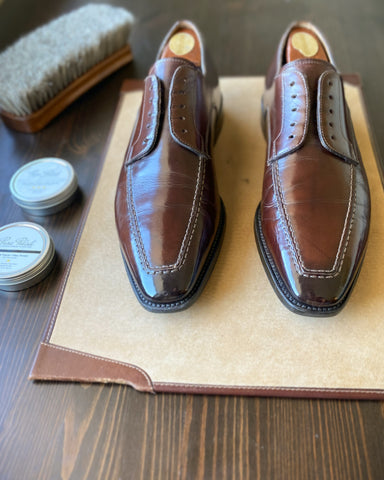
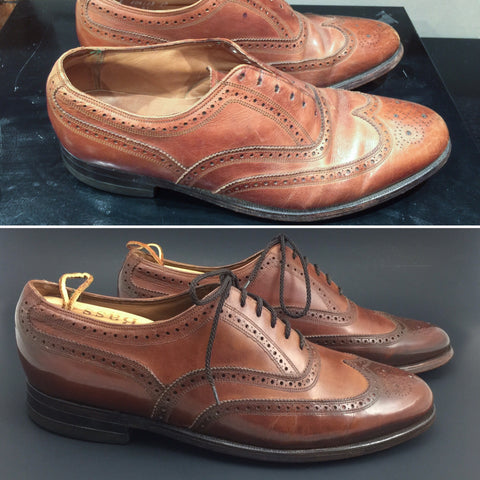
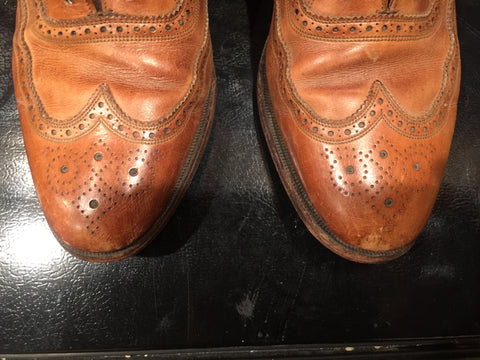
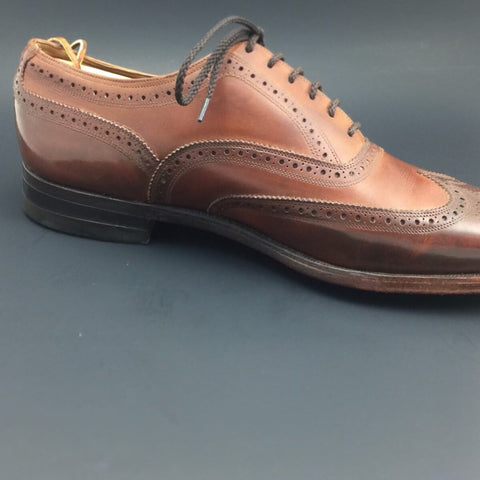
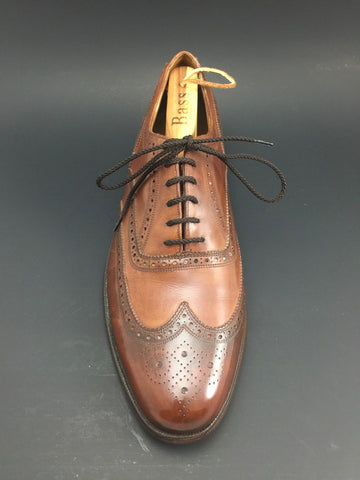
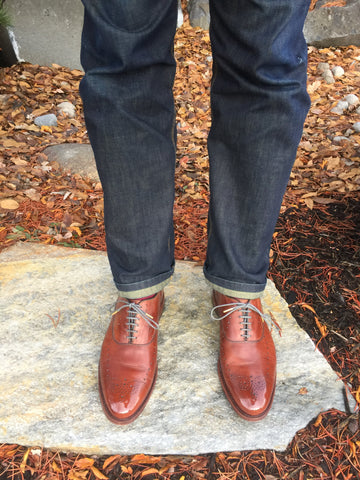
Here's another example of lensing.
If you'd like to share your lensing or shading projects you've completed, send us your pics and we'd love to share it with the Pure Polish community!
]]>